v 4.1.x-4.4.x Time planning
- Mariia Korolishyna
Analytics
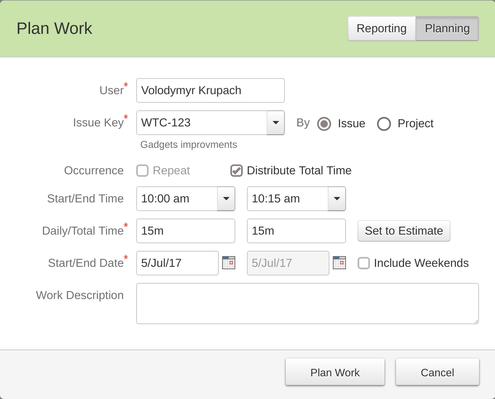
To plan your work select a date and a time period you've spent on an issue. Click the left mouse button in a date column, opposite the time when you started to work and drag the mouse to select the appropriate time frame. The "Planning and Log Work" dialog appears when you release the button. The "Start/End Time", "Time Planned" and "Start Date" fields are filled based on your selection. You may need to switch to planning mode by clicking "Planning" button at the top right corner of the pop-up dialog.
Planning can be done on issue or project levels. When the cursor is in the "Issue Key" or "Project Key" field, start typing a key of the issue/project you want to report time on or a word from the "Issue Summary" or "Project Name" fields. An auto-complete text appears below the field while you type. Just select the issue or project you want to plan for. Fill the "Work Description" and press the "Log Work" button.
Click on "Repeat" check-box to automatically create recurring planning records. Weekends are skipped unless "Include Weekends" is checked. You can plan your work up to 90 days ahead.
By checking "Distribute Total Time" you can create planning entries based on predefined time or issue estimations. Click "Set to Estimate" to populate issue remaining estimate. Weekends are skipped unless "Include Weekends" is checked. You can distribute up to 500 hours.
When distributing the Total Time the End Date is re-calculated, and vice versa, when planning based on Start/End dates the Total Time is re-calculated.
Edit planning entry
There are 3 ways to edit your planned time.
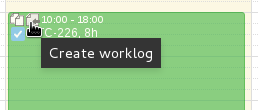
1) You can click on a time block and the "Plan Work" dialog is shown. Adjust fields you are interested in, hover over the top of the time block and click 'Create Worklog'.
2) Drag and drop the time block to move the planning to different time or another date.
3) Increase or decrease the planned time by clicking on the block's bottom part and stretching or shrinking the block.
Delete planning entry
Click on a time entry block and press "Delete" button. Another dialog appears where you need to confirm your intention.
Copy planning entry
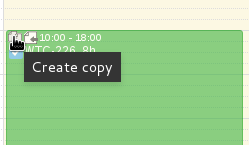
To quickly copy recurring planning entries, locate the time block you want to copy and click the "Copy" icon at the top left corner of the block. The "Plan Work" dialog appears with the same values as in the original planning entry. Click the "Log Work" button and you have the copy of the selected entry.
Create worklogs from planning entries
When needed, worklog entries can be easily created from the planning blocks in one click. Hover and click the "Create worklog" icon. The "Log Work" dialog appears with the same values as in the original planning entry. Adjust the fields and press the "Log Work" button.